

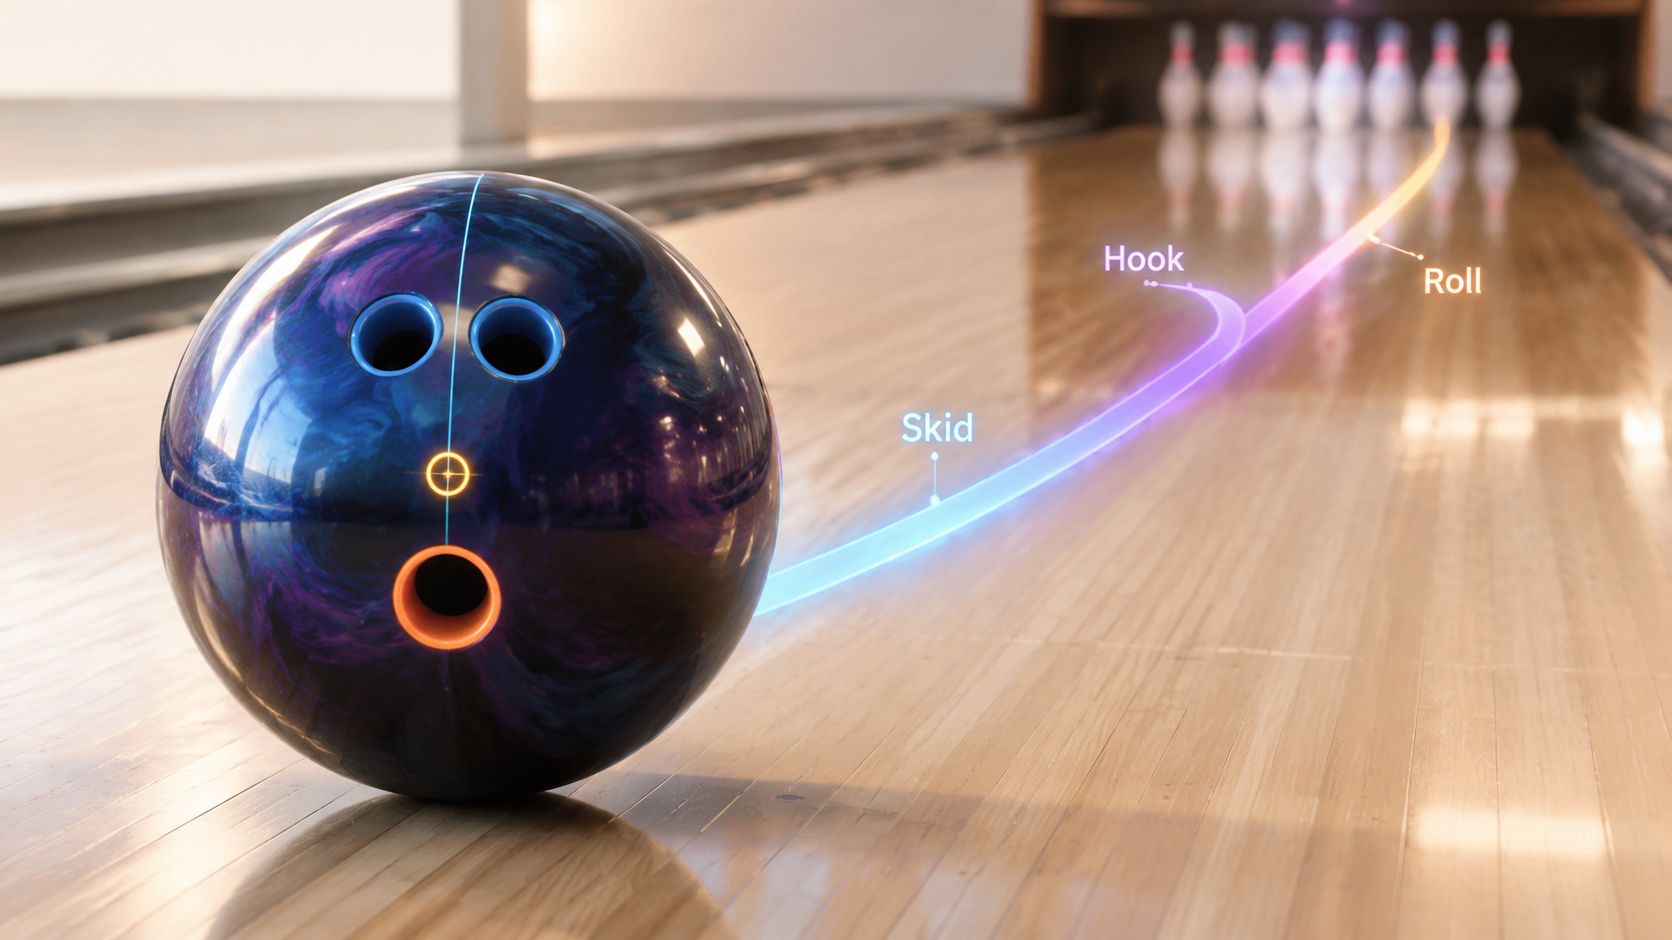
You're in league, and the ball that looked perfect during practice suddenly skids past the breakpoint, jerks sideways, and arrives weak. The next shot reads early and rolls out. You change targets, blame the oil, and wonder whether a different bowling ball would solve the problem.
Sometimes the better question is simpler: how was the ball drilled?
Bowling ball drilling layouts influence when the ball leaves the skid phase, how strongly it changes direction during the hook phase, and how soon it settles into roll. They won't replace a suitable coverstock, a clean release, or proper surface preparation, but they give a pro shop a way to tune the same undrilled core for different bowlers and lane conditions.
Most consumer guides assume you already know your positive axis point, or PAP. Many league bowlers don't. Others have a release that changes enough that their PAP is difficult to measure consistently. That gap matters because layout decisions also depend on ball speed, rev rate, axis rotation, and axis tilt, as noted in this general drilling-layout guide. This guide explains both the precise PAP-based method and practical low-data choices, then pairs seven Amazon bowling ball options with sensible questions to ask your driller.
Table of Contents
- Introduction to Drilling Layouts and Ball Motion
- Understanding Key Variables in Drilling Layouts
- How Layout Choices Affect Ball Reaction
- Recommended Layouts for Different Player Styles
- 7 Best Amazon Bowling Balls for Bowling Ball Drilling Layouts
- Pro Shop Best Practices for Layout Selection
- Conclusion and Next Steps
Introduction to Drilling Layouts and Ball Motion
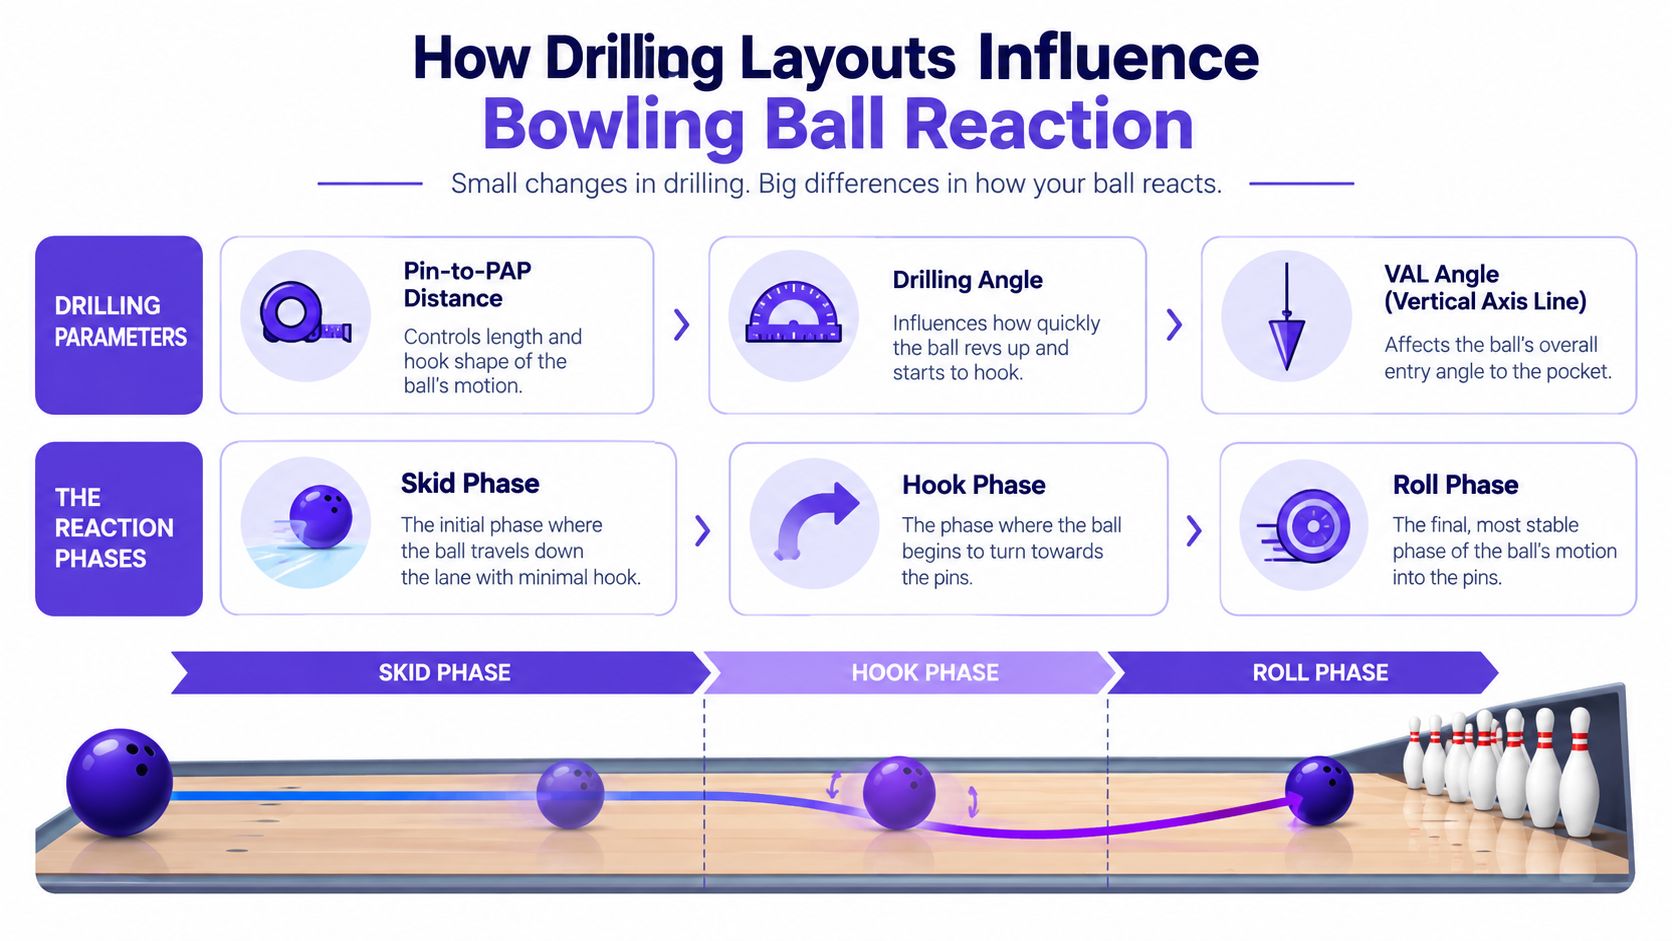
A bowling ball moves through three broad phases. It first skids, conserving energy as it travels through the front of the lane. It then hooks, responding to friction and changing direction. Finally, it rolls, stabilizing as it enters the pins.
The drilling layout affects the timing and shape of those phases. A layout can encourage earlier revving and a smoother transition, or help the ball retain energy and create a sharper move downlane. The result depends on the interaction between the layout, the core, the coverstock, the lane surface, and the bowler's release.
That's why two bowlers can use the same ball and see completely different reactions. A speed-dominant player may need help creating earlier traction, while a high-rev player may need a layout that smooths the transition. A tweener, someone between those release profiles, often needs a middle ground that doesn't overreact in the front or lose energy at the back.
Why inconsistent reaction often starts before the first shot
Suppose your ball jumps off the dry and then quits before the pocket. You might respond by changing your target, but the underlying issue could be a layout that reads too early for your rev rate or a surface that's too rough for the lane. If the ball skids too long, the opposite problem may appear: the ball reaches the pocket with too much angle or misses the breakpoint entirely.
Drilling isn't a magic adjustment. It's one part of an equipment match. Still, it's one of the few ways a pro shop can change the motion characteristics of a ball without replacing its core and coverstock.
The PAP problem for everyday bowlers
A PAP-based layout uses a measured reference from your release. If you don't know your PAP, a driller can estimate your release profile from ball motion, track flare, speed, rev rate, and axis rotation. That approach isn't as exact as a properly measured PAP, but it can be practical for a league bowler who wants a predictable first layout.
Practical rule: If your release is still changing, ask for a forgiving layout and treat your first ball as a baseline rather than a permanent description of your game.
The most useful goal isn't maximum hook. It's a reaction you can read, repeat, and adjust when the lane changes.
Understanding Key Variables in Drilling Layouts
Bowling ball drilling layouts became a formal performance concept as ball technology evolved from simple, low-mass weight blocks to reactive-resin-era cores. Older weight blocks mainly replaced mass removed during drilling. Modern layouts instead use the relationship among the pin, mass bias marker, and the bowler's PAP, as explained in this technical history of drilled balls.
The three markers on the ball
The pin marks the position of the core's pin. It gives the driller a starting reference for arranging the core relative to your PAP. Pin placement doesn't independently dictate every part of the reaction, but it strongly affects the layout options available and the resulting flare potential.
The mass bias marker, often called the PSA marker on an asymmetrical ball, identifies a preferred spin axis built into the core. On a symmetrical ball, the driller uses the center of gravity reference instead. The drilling angle is measured from the pin toward the preferred spin axis on asymmetrical balls, or from the pin through the center of gravity on symmetrical balls, according to this Dual Angle layout reference.
Your PAP is the axis around which the ball initially rotates after release. It isn't a mark you can reliably guess from the logo or from where your fingers sit. A pro shop can identify it by observing your track and release, then use it as the geometric reference for the layout.
How the numbers describe the layout
A common Dual Angle layout uses three measurements:
- Drilling angle, the angle between the pin-to-PAP line and the pin-to-PSA or center-of-gravity reference. It helps determine how quickly the core responds and when the ball begins to rev.
- Pin-to-PAP distance, the distance from the pin to your PAP. It's a major control for flare potential and the overall shape of the motion.
- VAL angle, the angle between the pin-to-PAP line and the vertical axis line. It helps control how quickly the ball transitions from skid into hook and roll.
VLS systems use related PAP-based geometry, including pin-to-PAP, PSA-to-PAP, and pin buffer distances. The important idea is that these systems translate a visual ball choice into measurable geometry. A notation such as 4.5 x 4 x 4.5 isn't a decorative label. It represents decisions about core orientation and motion timing.
Why the same undrilled ball can fit different games
The undrilled ball provides the core and coverstock. The layout determines how the driller positions that core in relation to your release. That's why drilling can materially tune the same model for different lane conditions and bowler styles.
If you're still learning lane reading, pair layout knowledge with a basic guide to reading bowling lane oil patterns. The lane tells you where the ball needs to read. The layout helps determine how the ball gets there.
For a visual explanation of these variables, use the following coaching video.
How Layout Choices Affect Ball Reaction
Think of layout selection like tuning a guitar. The coverstock and core provide the instrument, while the layout changes how the instrument responds to your input. A small change in geometry can alter timing, but the sound still depends on the entire setup.
The three main controls are drilling angle, pin-to-PAP distance, and VAL angle. They don't operate in isolation, and a layout that works for one release can be a poor match for another.
Pin-to-PAP distance controls flare and shape
Pin-to-PAP distance is one of the clearest ways to discuss flare potential. Shorter placements generally encourage earlier, smoother motion. Longer placements tend to preserve length and create more backend angle.
A manufacturer drilling chart illustrates the contrast with exact examples. It identifies 1-1/2 to 2 inches as a low-flare setup, 3-3/8 inches as high-flare, and 5 to 5-1/2 inches as a length-oriented setup with less hook, as shown in these Motiv drilling instructions.
That doesn't mean the longest distance always hooks less overall. It means the ball's flare and energy distribution can change, producing a different shape at the breakpoint and through the pins.
Drilling angle affects transition timing
The drilling angle shifts the core relationship around the bowler's PAP. Expert coaching materials describe it as a control for how early the ball begins to roll. A smaller drilling angle commonly produces an earlier response, while a larger angle can delay that response, depending on the core and the rest of the layout.
For a speed-dominant bowler, delaying the hook slightly may help the ball retain energy before the breakpoint. For a high-rev player, earlier core response can help prevent the ball from over-skidding, but too much early motion may make the ball burn energy before the pocket.
VAL angle shapes the move through the phases
VAL angle governs how quickly the ball transitions through its motion phases. A smaller VAL angle is commonly described as pin-up and faster transitioning. A larger VAL angle, roughly 65 to 90+ degrees, is commonly described as pin-down, smoother, or slower transitioning, according to this Dual Angle coaching explanation.
Use the phase language to evaluate the result:
- Too much skid: The ball doesn't pick up the lane soon enough, so a shorter pin-to-PAP distance or earlier-response geometry may help.
- Too much hook: The ball changes direction before reaching the breakpoint, so a smoother layout, surface adjustment, or different coverstock may be more appropriate.
- Too much roll: The ball reads early but loses continuation, so preserving length may be more useful than adding friction.
Before choosing a layout, learn how reactive, urethane, and plastic bowling balls differ. Layout can refine a ball's reaction, but it can't turn a plastic spare ball into a heavy-oil piece.
Recommended Layouts for Different Player Styles
A layout should answer a motion problem. Don't start with a favorite number and force every ball into it. Start by describing what happens on the lane, then choose geometry that moves the reaction in the needed direction.
Speed-dominant bowlers
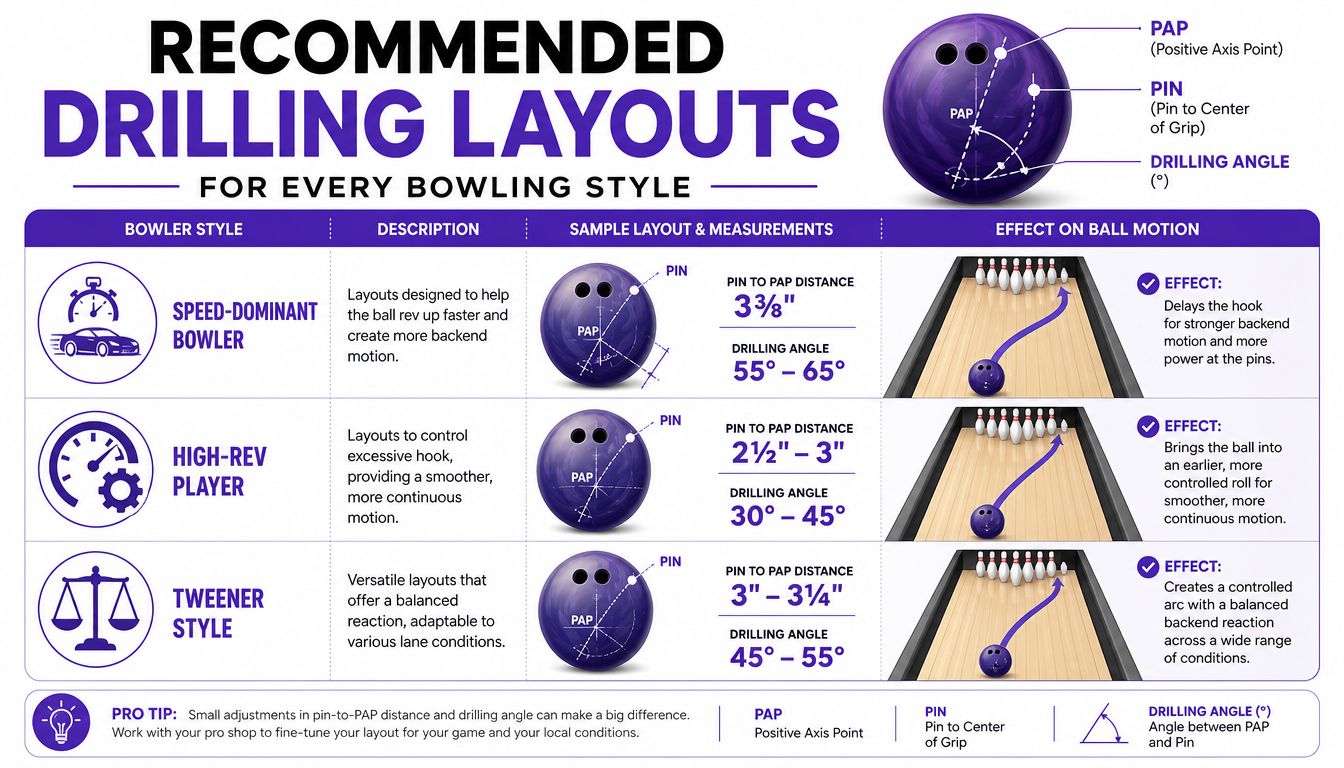
A speed-dominant bowler often needs the ball to establish traction without losing all its energy before the pins. A 3-3/8-inch pin-to-PAP distance is a useful example for creating substantial flare potential, while a longer drilling angle can delay the hook response. The best choice still depends on the bowler's axis rotation, tilt, coverstock, and surface.
If your ball skids too far and misses the breakpoint, don't automatically shorten the pin-to-PAP distance. Surface preparation may offer the more repeatable correction. If the ball reads early but doesn't continue, a length-oriented layout can preserve energy more effectively.
High-rev players
High-rev players usually create plenty of rotation and friction. Their problem is often not getting the ball to hook. It's keeping the ball from responding too violently or too early.
A shorter pin-to-PAP distance can bring the ball into an earlier, more controlled roll. A larger VAL angle can also create a smoother transition, though the final reaction depends on the full geometry and ball construction. Bowlers comparing this style can use a high-rev bowling ball guide to think about ball strength and layout together.
Tweener styles
A tweener has a balanced blend of speed and rev rate. That player often benefits from a medium pin-to-PAP distance and a moderate drilling angle, producing a controlled arc rather than an abrupt skid-flip shape.
This is a strong place for a PAP-free starting layout. Ask the driller to watch several shots, identify your approximate track, and choose a middle reaction that leaves room for surface adjustments. Once your release stabilizes, the pro shop can measure PAP and refine the next ball with more confidence.
A practical comparison
| Motion goal | Layout direction | Typical use |
|---|---|---|
| Earlier, smoother read | Shorter pin-to-PAP distance and smoother VAL choice | High-rev players or bowlers facing early friction |
| Balanced arc | Medium pin-to-PAP distance and moderate drilling angle | Tweeners and general league conditions |
| More length and backend | Longer pin-to-PAP distance or slower response geometry | Speed-dominant players or cleaner fronts |
For symmetrical balls, the strongest flare commonly appears around 3 to 4 inches of pin-to-PAP distance. Asymmetrical balls generally show their strongest flare across roughly 2.75 to 6.25 inches, according to this pin-to-PAP coaching reference. Those ranges describe tendencies, not guarantees. Your driller still needs to account for the specific core and your release.
7 Best Amazon Bowling Balls for Bowling Ball Drilling Layouts
Amazon can make ball shopping convenient, but the listing isn't the fitting process. Confirm the ball's weight, coverstock, and core details, then take the undrilled ball to a qualified pro shop. The recommendations below are layout starting points, not universal prescriptions, and the exact choice should follow your PAP when it's available.
Because the provided evidence doesn't verify current Amazon inventory, prices, or individual product specifications, use the product names as shopping candidates and verify the live listing before purchasing.
| Bowling Ball | Coverstock | Recommended Layout | Best For |
|---|---|---|---|
| Storm Phaze II | Verify current listing | Medium pin-to-PAP, moderate VAL | Tweener seeking a benchmark shape |
| Brunswick Rhino | Verify current listing | Longer pin-to-PAP, smoother response | Beginners and lighter lane conditions |
| Motiv Venom Shock | Verify current listing | Medium pin-to-PAP, controlled VAL | League bowlers wanting readable motion |
| Hammer Raw | Verify current listing | Shorter or medium pin-to-PAP | Bowlers needing manageable traction |
| Roto Grip Hustle | Verify current listing | Medium pin-to-PAP with controlled transition | Developing players and medium conditions |
| Ebonite Game Breaker | Verify current listing | Benchmark medium-distance layout | Balanced league reaction |
| Storm Tropical Surge | Verify current listing | Longer pin-to-PAP for added length | Dry or lighter conditions |
How to use the list
Storm Phaze II and the Ebonite Game Breaker make sensible benchmark candidates when you want a readable arc rather than an extreme shape. Ask your driller to choose a moderate layout that reflects your current release, then adjust surface if the ball reads too soon or too late.
The Brunswick Rhino, Hammer Raw, and Storm Tropical Surge are better considered when you need easier length or a less forceful overall reaction. A longer pin-to-PAP setup can help preserve length, but the coverstock and lane friction remain decisive.
The Motiv Venom Shock and Roto Grip Hustle can suit league bowlers who want control without giving up all downlane motion. For a PAP-unknown bowler, request a middle-of-the-road layout and have the pro shop record the measurements. That record gives you a useful reference for future equipment.
Don't buy a ball because a product page promises a universal reaction. Choose the ball that fills a gap in your current equipment, then let the driller match the layout to your release and intended lane use.
Pro Shop Best Practices for Layout Selection
A good layout begins with a good conversation. Tell the driller your ball speed, rev rate if known, axis rotation, typical miss, preferred breakpoint, and the lane conditions where you'll use the ball. If you don't know those details, bring the ball to the lanes or describe what the ball does at the front, breakpoint, and pins.
Questions to answer before drilling
- What motion is missing? Do you need earlier traction, a smoother transition, or more backend continuation?
- How stable is your release? If your PAP changes from shot to shot, choose a forgiving baseline rather than chasing a highly specific reaction.
- What will the surface do? Surface preparation often changes the ball's response more directly than a small layout adjustment.
- How will the ball fit your hand? Span, pitches, hole sizes, and thumb feel affect release quality. A powerful layout can't compensate for a poor fit.
- What are the league rules? Confirm that the finished ball complies with current USBC specifications.
USBC regulations limit the ball to five gripping holes total, with one hole per finger and one thumb hole for the same hand. Each gripping hole may not exceed 1-9/16 inches in diameter or 4-1/2 inches in depth, and removable-device holes count toward that total, according to the USBC equipment specifications manual.
Balance holes also require care. USBC allows no more than one vent hole per finger or thumb hole, and each vent hole may not exceed 1/4 inch in diameter. A non-gripping hole that intersects a gripping hole is treated as a vent hole under the current USBC equipment specifications.
After drilling, test the ball on the lane rather than judging it from the ball return. Ask whether the shape matches the intended phase timing. If it doesn't, change one variable at a time, such as surface or fit, before ordering a new layout.
Conclusion and Next Steps
Bowling ball drilling layouts give you a structured way to influence skid, hook, and roll. Pin-to-PAP distance affects flare potential and motion shape. Drilling angle influences response timing. VAL angle helps determine how quickly the ball transitions through its phases.
You don't need to know your PAP before making a useful decision. If your PAP is unknown, ask a pro shop to observe your release, estimate a forgiving layout, and document the measurements. That first ball can become a baseline for a more precise PAP-based layout later.
Choose a ball based on the gap in your equipment, not on the biggest hook rating. Then test the finished reaction on your normal lane conditions, adjust surface or fit when appropriate, and reserve a full layout change for a clearly identified motion problem.
Bowling Gear Reviews offers independent bowling equipment reviews, comparisons, and practical fit guidance for bowlers choosing balls, shoes, bags, and accessories. Visit Bowling Gear Reviews to compare equipment and find clearer advice before your next drilling appointment.
