

You’ve spent hours at the alley, you know the theory, but your release is still as unpredictable as a rookie’s first tournament. One shot is perfect, the next one is a disaster. The key to breaking through this plateau lies in muscle memory and flawless mechanics, and the fastest way to build that is by using the right drills to improve bowling release equipment. These aren’t just gadgets; they’re feedback machines designed to force your hand, wrist, and arm into the perfect position, shot after shot, until it becomes second nature.
A weak or inconsistent release is the silent killer of high scores. It robs your ball of power, kills your hook potential, and makes adjustments a guessing game. By investing in the right training tools, you’re not just practicing; you’re programming your body for a powerful, repeatable motion that holds up under pressure. We’re going to break down the essential gear that will transform your practice sessions and, ultimately, your entire game in 2026.
Why a Killer Release is Non-Negotiable
Your release is the last point of contact you have with the ball. It’s the moment where all the energy from your approach is transferred into revolutions and axis rotation. A clean, powerful release is what separates the 150-average bowler from the 220-average shark.
Think of it like this: a great release imparts high revs and a consistent axis tilt, allowing the ball to read the lane correctly and drive through the pocket with explosive force. A poor release, on the other hand, is like a dud firework—all fizzle and no bang.
Common Release Flaws Holding You Back
We see the same mistakes over and over. Bowlers “chicken wing” their arm, breaking their form and losing power. Others grab or squeeze the ball at the bottom of the swing, killing revs and accuracy. The most common culprit is “coming over the top” of the ball, which turns a potential hook into a weak, ineffective roll.
These bad habits are tough to break because they often feel natural until you see the poor results on the scoreboard. Without targeted feedback, you’re just reinforcing bad mechanics with every practice frame.
How Training Equipment Cements Good Habits
This is where specialized equipment comes in. The right tools provide immediate, undeniable physical feedback. You can feel when you’re doing it right and, more importantly, when you’re doing it wrong.
They are designed to guide your muscles through the correct sequence, building the specific strength and muscle memory needed for a pro-level release. It shortens the learning curve dramatically, turning frustrating practice into productive, game-changing sessions.
The Best Drills to Improve Bowling Release Equipment for 2026
Ready to overhaul your release? Let’s dive into the essential tools that provide the most bang for your buck. These are the items we at Bowling Gear Reviews recommend to bowlers who are serious about improving their consistency and power.
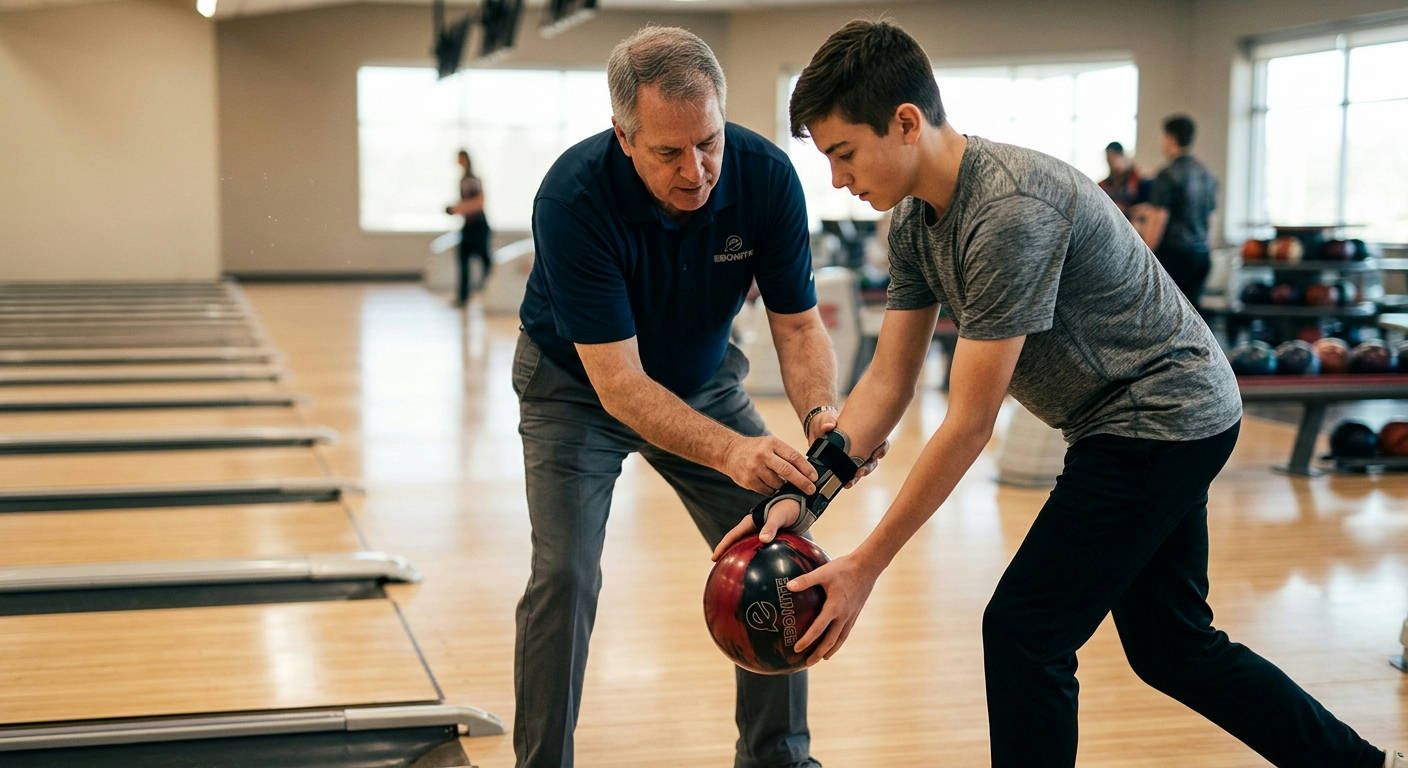
1. The Pro-Level Release & Rev Trainer
This is the cornerstone of any serious bowler’s training arsenal. It’s typically a device shaped like the core of a bowling ball, often lighter, with finger holes that force your hand into the correct “under and behind” position. You can’t cheat it; if you come over the top or break your wrist, you’ll know instantly.
By swinging this trainer at home or before a game, you’re ingraining the feeling of a perfect release. The goal is to feel the roll off your fingertips, not a clumsy heave from your palm. It’s the single best tool for developing the muscle memory needed for a high-rev, high-power shot.
- What We Love: Provides instant tactile feedback on your hand position. Excellent for “no-step” drills to isolate the arm swing.
- Keep in Mind: It’s not a real bowling ball, so the weight and feel won’t be identical. Its purpose is purely mechanical.
2. The Power Wrist & Forearm Fortifier
A powerful release starts with a strong, stable wrist. If your wrist collapses at the bottom of your swing, you lose all your leverage and revs. That’s why a high-quality wrist and forearm strengthener is an essential, if often overlooked, piece of equipment.
Look for adjustable models that allow you to increase resistance as you get stronger. Gyroscopic wrist exercisers are also fantastic, as they engage the smaller stabilizer muscles that are crucial for maintaining a firm wrist position through the entire swing. Using this for just 10-15 minutes a day can dramatically improve your ball control and endurance.
- What We Love: Directly builds the foundational strength needed for a consistent release. Can be used anywhere, anytime.
- Keep in Mind: This is a strength builder, not a technique tool. It must be paired with on-lane practice.
3. The Form-Locking Power Brace
Consistency in bowling comes from a repeatable physical sequence. A power brace or position trainer is a wearable device that helps lock your body into the ideal form. Some focus on keeping your elbow tucked in to prevent “chicken winging,” while others help you maintain balance and posture during the slide.
This type of tool is invaluable for bowlers who struggle with their overall mechanics leading up to the release. Remember, a great release is impossible without a great approach. This equipment fixes the root cause of many release issues by ensuring your body is in the right place at the right time.
- What We Love: Corrects fundamental form issues that lead to release problems. Forces you to build good habits from the ground up.
- Keep in Mind: Can feel restrictive at first and takes some getting used to. Start with short practice sessions.
4. The Microfiber Follow-Through Towel
This might sound ridiculously simple, but it’s a classic drill for a reason. Taking a simple microfiber bowling towel and practicing your swing with it is one of the best ways to feel a full, uninhibited follow-through.
The drill is simple: stand at the foul line, swing the towel just like you would a bowling ball, and release it at the bottom. A good release will send the towel flying straight down the lane. A bad release will send it fluttering off to the side or straight into the ground. It’s a cheap, effective way to work on extending your arm toward your target.
- What We Love: Incredibly simple and affordable. Excellent for feeling a complete follow-through and a free arm swing.
- Keep in Mind: This drill only works on the final part of the release and follow-through.
Check Price on Amazon: https://www.amazon.com/s?k=Microfiber+Bowling+Towel&tag=bowlinggear04-20
Buyer’s Guide: Choosing Your Training Arsenal
Not all training aids are created equal. As you shop, keep these key factors in mind to ensure you’re investing in gear that will actually help, not hinder, your progress.
Durability and Materials
Look for gear made from high-impact plastics, strong nylon straps, and reinforced stitching. You’ll be using these tools frequently, and the last thing you want is for them to fall apart after a few weeks. It’s often worth paying a bit more for a reputable brand known for quality construction.
Adjustability and Comfort
This is especially critical for any wearable gear like a wrist support or form brace. A one-size-fits-all approach rarely works. Look for equipment with multiple adjustment points (like velcro straps or dials) to ensure a snug, comfortable fit. If a tool is uncomfortable, you won’t use it.
“The best training aid is the one you actually use. If it’s a pain to set up or uncomfortable to wear, it’s just going to collect dust in your 3 ball bowling bag.”
Focus and Functionality
Be clear about what problem you’re trying to solve. Is your wrist weak? Get a strengthener. Is your arm swing wild? Get a form brace. Don’t buy a gadget just because it looks cool. Choose the tool that directly addresses the weakest part of your release. The most effective drills to improve bowling release equipment are targeted and specific.
How to Weave Training Aids Into Your Routine
Owning the gear is only half the battle. You need a structured plan for using it effectively. Dropping these tools into your practice without a purpose won’t get you very far.
The “No-Step” Release Drill
This is where you start. Stand stationary at the foul line with your release trainer tool. Without taking any steps, perform your arm swing and release motion. The entire focus is on your hand, wrist, and arm. Do this in sets of 10, focusing on getting a clean, crisp feeling as the tool leaves your hand. This isolates the release from the rest of your mechanics.
The “One-Step” Progression Drill
Once the no-step drill feels smooth and automatic, take one step back. Now, perform a one-step approach, concentrating on timing your slide with your release. This drill connects your footwork to your arm swing. The goal is to make the entire motion—from step to release—a single, fluid sequence.
Foundational Drills to Improve Bowling Release Equipment Effectiveness
Remember, these tools enhance fundamental drills; they don’t replace them. Continue to practice at-home mirror drills to check your form visually. Work on your balance at the foul line by holding your follow-through for a full three seconds after a shot. According to the USBC coaching manual, a stable and balanced finish position is a direct indicator of a well-executed shot. This solid foundation makes every piece of training equipment you use that much more effective.
Critical Mistakes to Sidestep
As with any training, there are pitfalls to avoid. Being aware of them will keep you on the fast track to a better release.
Over-Reliance on the Tool
Training aids are like training wheels on a bike. They are there to guide you and help you feel the correct motion. The ultimate goal is to perform a perfect release without the tool. Use them to build muscle memory, then gradually phase them out to see if the new-and-improved mechanics stick.
Ignoring Pain or Discomfort
This should be obvious, but it needs to be said. If a brace is pinching or a specific motion with a trainer is causing sharp pain, stop immediately. Improperly fitted equipment or underlying physical issues can lead to injury. Pushing through pain is never the answer and can derail your progress for months. If pain persists, it’s crucial to consult a professional, as even minor-seeming issues can be symptoms of repetitive strain injuries, a common concern in sports as outlined by sources like the Mayo Clinic.
Forgetting About Your Actual Bowling Ball
All the training in the world won’t matter if your primary piece of equipment is working against you. A dirty, oil-soaked bowling ball will react inconsistently, giving you false feedback and undermining your practice. Make sure you’re regularly cleaning your arsenal with a high-quality kit. A clean ball provides a predictable reaction, which is essential when you’re trying to fine-tune your release.
“A great release paired with a dirty ball is like putting a race car engine in a vehicle with four flat tires. You’re sabotaging your own power before the ball even hits the lane.”
The Final Frame: Your Path to a Perfect Release
Mastering the bowling release is a journey of a thousand shots, but it doesn’t have to be a frustrating one. By incorporating the right drills to improve bowling release equipment into a structured practice plan, you are giving yourself a massive advantage. You’re replacing guesswork with direct, physical feedback.
These tools build strength, ingrain proper mechanics, and provide the consistency that every serious bowler craves. Start by identifying your biggest weakness, choose the right tool for the job, and commit to the process. Before you know it, that powerful, high-rev release you’ve been chasing won’t be something you hope for; it will be what you do, every single time.